How to Make an Easy Upholstery Fabric Tote Bag
/How to make a simple tote bag from upholstery fabric.

Upholstery fabric makes great bags. It’s tough and hardwearing so will make a lovely long lasting bag. It can be a bit difficult to sew, especially on a basic sewing machine because layers of fabric can get a little too thick.
The answer is to keep things simple and minimise the number of bulky seams. This easy tote bag pattern does just that, let’s get started.
To make this bag I used 2 different upholstery fabrics, one was a flocked dark terracotta, I’ve called that fabric A. The other was an old curtain fabric with cream flowers, I’ve called that fabric B.

To make a simple upholstery fabric bag you will need:
2 pieces of fabric A 11” x 14” (here the darker fabric)
2 pieces of fabric B 17” x 14” (here the lighter fabric)
2 pieces of fabric for the handles 21” x 4” (mine are fabric A but either fabric would work)
First make the handles

Take one of the handle fabric pieces and place it right side down. Fold the top edge down 1” to the centre and the bottom edge up 1” to the centre and press. Fold in half to bring the 2 folded edges together and pin. Sew along both long edges to form a nice sturdy handle. Repeat for the other handle.
Applying the handles

Take a handles and pin it into place on the top edge of fabric A. Fabric A is 11” tall and 14” wide, just double check that you have it the right way up and you are positioning your handles on one of the longer 14” sides! Position it 3” in from the edges and make sure it’s not twisted. Use 2 pins and position them a good inch from the top edge. Using 2 pins will make sure your handles don’t slip sideways as you sew and if the pins are positioned quite low down they won’t get in the way of your stitching.
Place fabric B on top and pin together. Then sew along the top edge. Your machine might struggle a little when it gets to the handles as you’ll have 6 layers of fabric, just take your time. There is a little gadget called a Bulky Seam Aid that helps with negotiating thick layers like this which you might consider if you do a lot of this kind of sewing. You can also try stopping sewing, ease off the foot pedal altogether and turn the hand wheel a few turns just to get your machine over the bump.
Optional Top Stitching

At this point you might like to run a line of top stitching along the top of fabric A as shown in the photo above. You’ll catch the ends of the handle underneath which will add to their strength. I didn’t think to do this and ended up doing this line of top stitching after the next step making it much more fiddly. So if you want to add that extra line of stitching do it now! (a proper case of “don’t do as I do, do as I tell you!”)
Repeat for the other pieces so you have 2 identical bag pieces.
Assembling the bag

Place the 2 pieces right sides together, lining up the seams, and stitch all around, leaving a 4”-5” gap in the short side of fabric B

Turn the bag out through the gap and then stitch the gap closed.
Push the fabric B end of the bag down into the fabric A end. Spend a minute or two making sure it is all the way inside, nice and even and smooth. As fabric B is longer than fabric A the fold will be on fabric B. Pin the handles into place.
Now top stitch around the top edge of the bag catching the handles in your stitching. This will add further strength and stability to your bag handles.

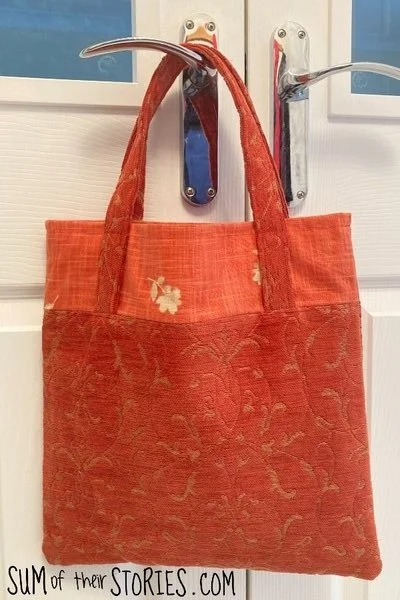
Your bag is finished. Use it for books, shopping, knitting…. whatever you like. It is super sturdy and should last for years.

I love a fully lined bag like this, when the inside is nice and tidy too.

Your finished bag will measure approximately 12.5” x 13”, depending on how big a seam allowance you allowed and the thickness of your fabric.
It would be very easy to size this bag idea up or down, it’s only a few simple pieces after all.
Alternative ideas for this easy tote bag pattern:
You are not stuck to using upholstery fabric to make this tote bag, this pattern will work with other fabrics too of course. You could mix denim from an old pair of jeans with an old flannel shirt or 2, that would look fabulous.
You could make a patchwork piece for fabric A.
You could make a really vibrant fun bag if every pattern piece was a different fabric, that might be a good way to use upholstery fabric samples maybe?
How about making a bag from plain fabric but adding some embroidery, applique or block printing to the pieces before you sew it together?
If you made this bag from thinner fabric, old bed linen or an old shirt for example, it would still be pretty sturdy but could roll up small and would be good to keep in your coat pocket or in the glove compartment/glove box as a handy emergency shopping bag.
So there you have it, a really simple tutorial to make a sturdy bag from upholstery fabric.
Julie
If you like sewing and bag making particularly, you might to like to check some of my other bag making ideas and tutorials.